How Do I Upload Image to Mturk Csv
Tutorial: How to label thousands of images using the crowd
Amazon Mechanical Turk (MTurk) is bang-up for crowdsourcing tasks using images. Requesters regularly ask Workers to do everything from transcribing text in images to labeling or categorizing them. Ofttimes the results are used to build training and validation datasets for car learning models.

Hither is an example of a typical task — showing an image to a Worker and asking: "was this photograph taken indoors or outdoors?"
Without crowdsourcing, manually reviewing and labeling thousands of images like this would take days or weeks. With MTurk you can get it done in a few hours.
Today we volition walk through an example of how to use MTurk to easily label a large collection of images.
Familiarity with MTurk or with writing code is not needed for this tutorial. You just need access to a spreadsheet tool such every bit Microsoft Excel or Google Sheets. Let'southward get started!
Get setup
Y'all will need:
- An MTurk Requester account.
- An MTurk Requester Sandbox account — this looks identical to the Requester account, but is created in the "Sandbox" which is an environment where you can endeavour publishing tasks without spending whatever money.
- An AWS account (this is a separate business relationship from the MTurk accounts).
You volition use the MTurk account to publish tasks (called "HITs" or "Human Intelligence Tasks" for MTurk Workers) and you volition utilize the AWS account to host your images for each task using Simple Storage Service (S3).
Put your images on Amazon S3
S3 is a file storage system that volition permit you upload all the images you demand labelled and generate publicly accessible links for each ane. Each task that you publish on MTurk volition display each of your images using those links.
Let's start with a local folder full of images :

To transfer these images to S3, we first demand to create a bucket to store them. This is simply the name of a location on the internet where people can access your images. For this example, we'll telephone call our bucket my-image-repo.

To make images accessible to Workers nosotros'll set the Permissions on the Bucket to be Read for Anybody. This ways anyone can view the files in this saucepan, simply simply nosotros will be able to add or remove them.

After creating the bucket we volition create a folder for this project.

At present we can upload all of our images to this folder. Simply select the Upload button and so drag the images to the browser to go started.

Note that nosotros'll want to set up the permissions to let everyone read them equally well.

It will have a few minutes to upload everything.

For larger batches, we recommend using the AWS Command Line Interface instead of dragging images directly into the console.
One time complete, if we click on one of the files uploaded and we will encounter the public link for the image. The link includes the S3 server where the image is stored, the bucket proper name, the folder and the file proper noun.

Fees for storing files on S3 can exist seen on the S3 pricing page. MTurk tasks can display whatsoever publicly hosted image, so yous are also welcome to use alternatives to S3 if you prefer.
Create a list of files
In order to use the newly uploaded images, we will need a list of them.
Using Windows, a simple way to generate a list is to run the following command from the command line in the images folder:
C:\images> dir /b /a-d > file_list.csv On Mac or Linux, the ls -1 control does the same thing from the Terminal:
images$ ls -one > file_list.csv Keep this CSV file handy. We will need it to create tasks ("HITs) on MTurk.
Create an MTurk Project
At present it is time to create an MTurk Projection. Log in to the MTurk Sandbox and click on the "Create Projection" link in the "Create" tab. From the listing of projection templates available, select the "Tagging of an Image" template. MTurk templates are defined using HTML/CSS and tin be readily modified. We will tweak the bones settings of this template to go what we demand.
After selecting the template and clicking on "Create Projection" nosotros tin can enter some basic settings for our tasks:
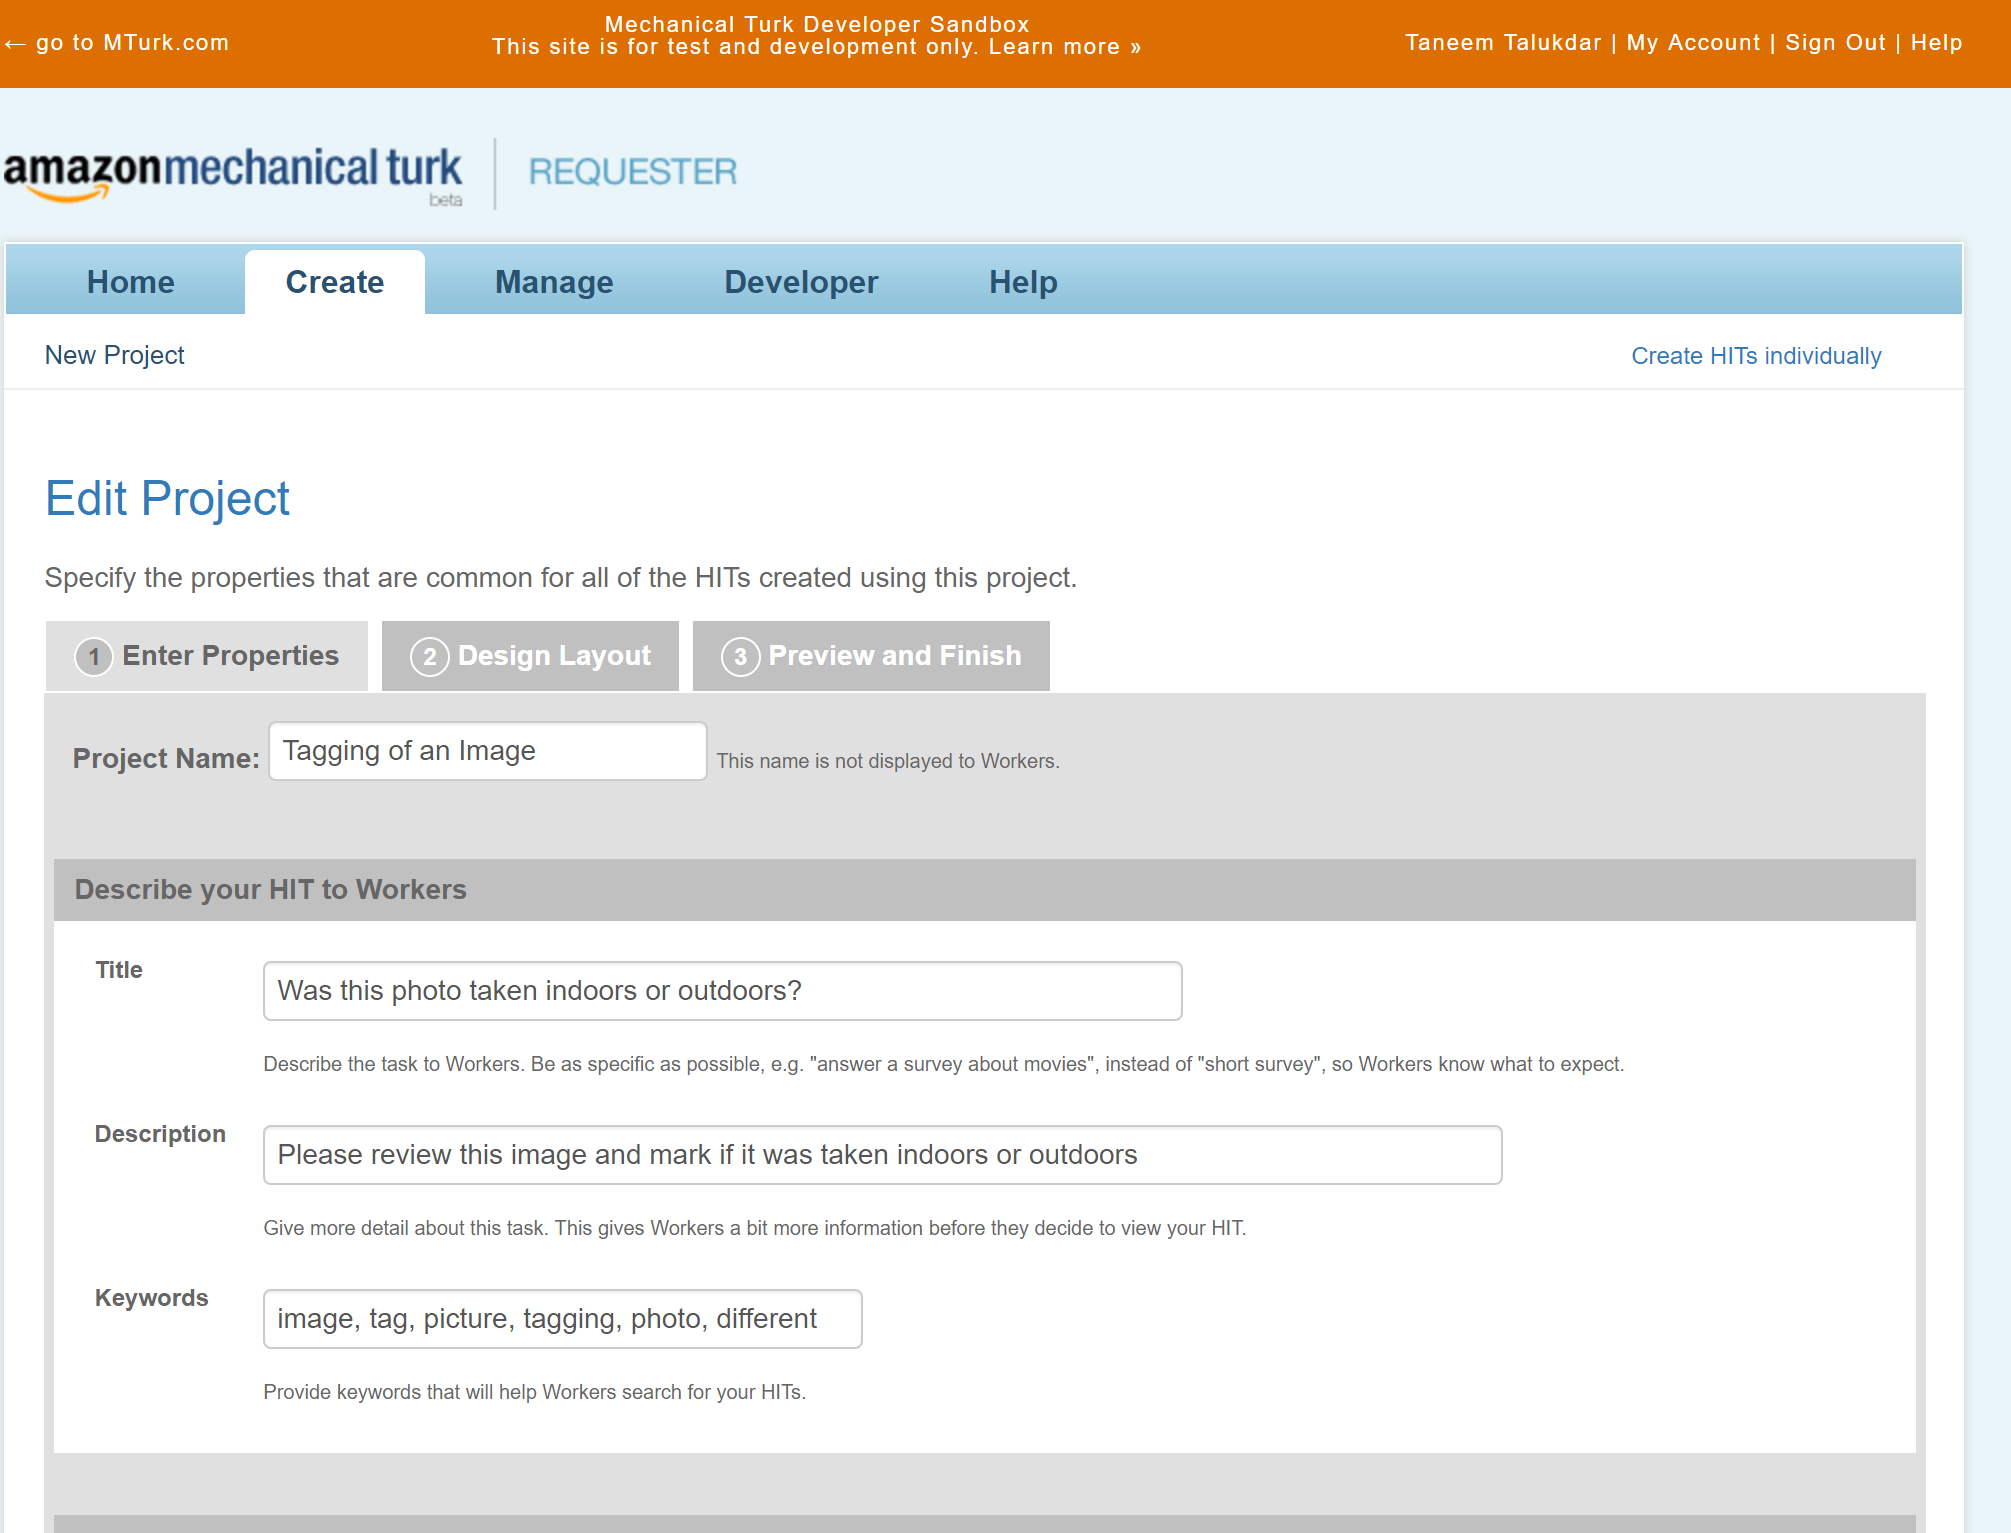

Each Hit nosotros publish on MTurk tin can be worked on by one or more Workers, and each submission from each Worker is called an "assignment". Information technology can be useful to generate several assignments for a HIT as you tin can use the results from multiple workers on the aforementioned image to cross-check for accuracy or for ML training, to help reduce potential bias.
This screen lets us define how many assignments we desire for each HIT and the reward amount for each assignment along with some other settings. Since this is in the Sandbox, the advantage per assignment is ignored.
Once we are done with this screen, nosotros volition exist able to tweak this template for our purposes.
Let'due south adjust the instructions, and remove the textfield options and leave the radio buttons. We will bouble click on the radio buttons to configure them with the correct labels so nosotros become back nicely labelled results later:

Set the Value to "1" for both radio buttons.
Nosotros will double- click on the "image_url" icon and adjust it from ${image_url} to https://s3.amazonaws.com/my-image-repo/mturk-images/${image_url}:

The ${image_url} fleck is a template variable that will be substituted with the actual name of the image from your CSV file when you publish a tasks using this template.

Lastly, nosotros will click on the "Source" button and remove the "required=" attribute in the ii radio buttons nosotros have:

This ensure that nosotros don't require the Worker to click on both radio buttons. It also gives us a peek into how one tin can configure MTurk templates with the total power of HTML, CSS and Javascript.
After saving changes, the projection is now fix!

Publishing batches
Now the project is prepare it is time to utilize it to publish batches of tasks. Let'south start by clicking on the "Publish Batch" button on the new project:

Now we are prompted to add our CSV file of file names. Before we add together our CSV file, we just need to add together one more thing — the name of the template variable ("image_url") that we used in our template before. In the CSV file, we can add that to the top of the file using Notepad or Textedit:

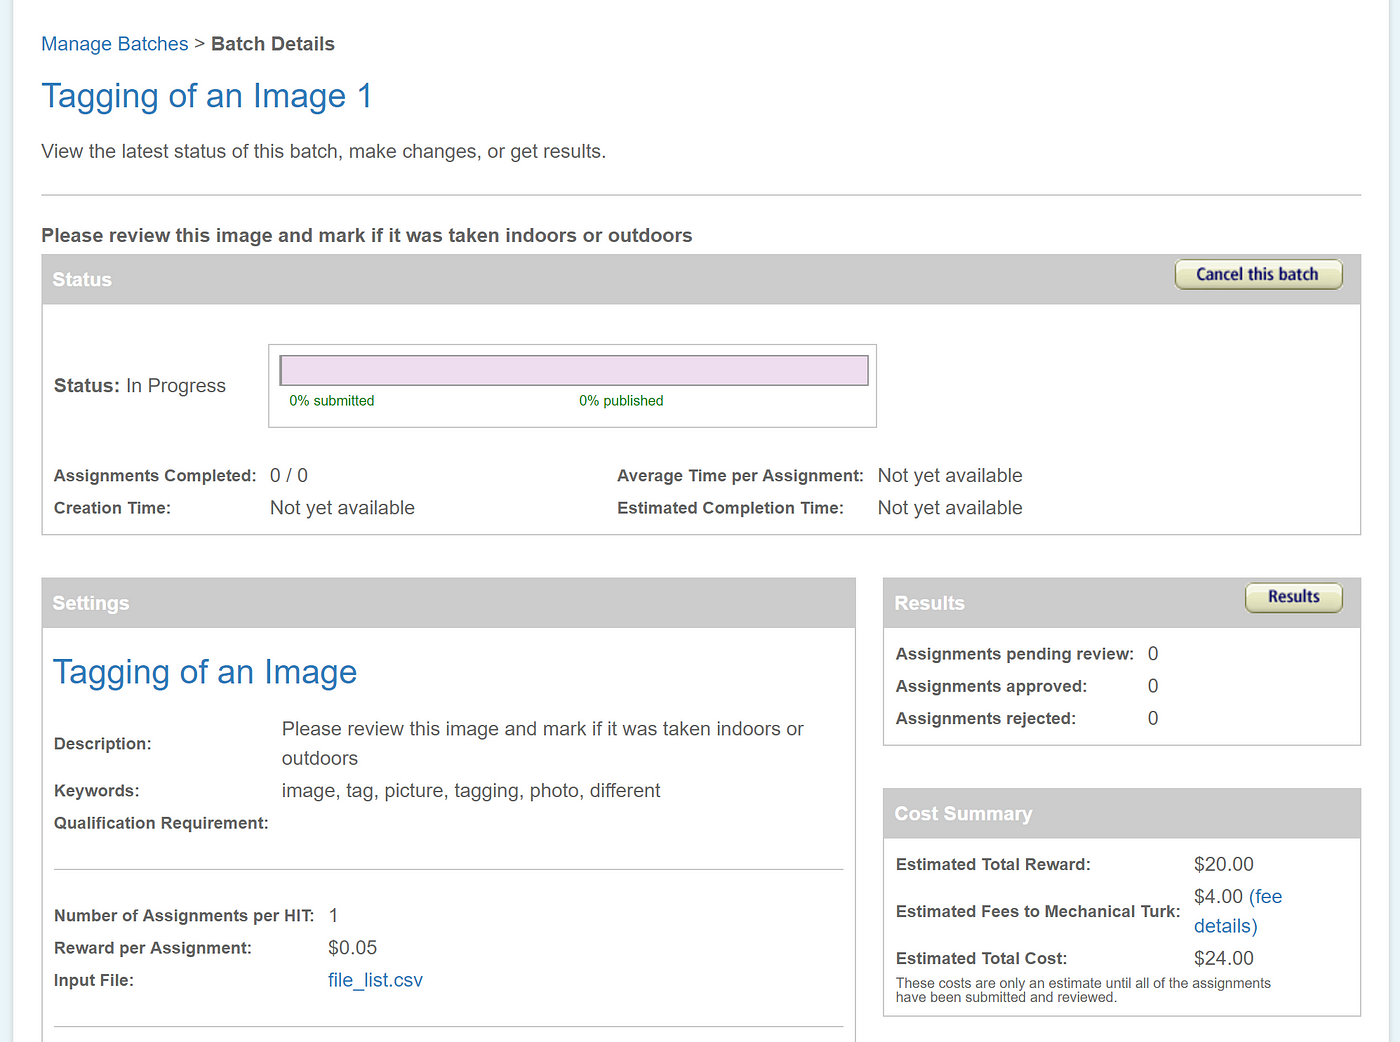
Now we can upload our CSV file and publish our batch afterwards previewing the details:


And that's information technology. At present nosotros await for Workers to choice upwardly the job and consummate information technology:
Of course in that location are no Workers looking for tasks in the Sandbox. However, you can create your own test Worker account and complete your tasks from the Worker Sandbox to run across what the results wait like.
Once results are available, you tin find them by clicking on the "Results" button, from where you can as well download a CSV file by clicking on the Download CSV file.

That covers the nuts of getting big batches of images labelled on MTurk. After this there are a few other things to bank check out, including how to corroborate or reject work from Workers, how to utilize Qualifications, how to send Workers Bonuses, and more than from our Requester UI guide.
We promise you constitute this tutorial helpful. If you lot have any questions, please mail service a question to our MTurk forums. To become a Requester, sign up here. Desire to contribute as a Worker client? Get started here.
Source: https://blog.mturk.com/tutorial-how-to-label-thousands-of-images-using-the-crowd-bea164ccbefc